Old-Fashioned Rag Doll

I am so excited to be adding a new project today. It has been quite a while since my last project and I am happy to be able to share something new with you.

Recently, I was inspired by history and found some great historical projects that I wanted to make.

The first was a rag doll. Rag dolls are so easy! The body of the doll is created by tying together strips of fabric. The accessories can be sewn or not sewn depending on your preference.

Rag Doll with Sewn Accessories

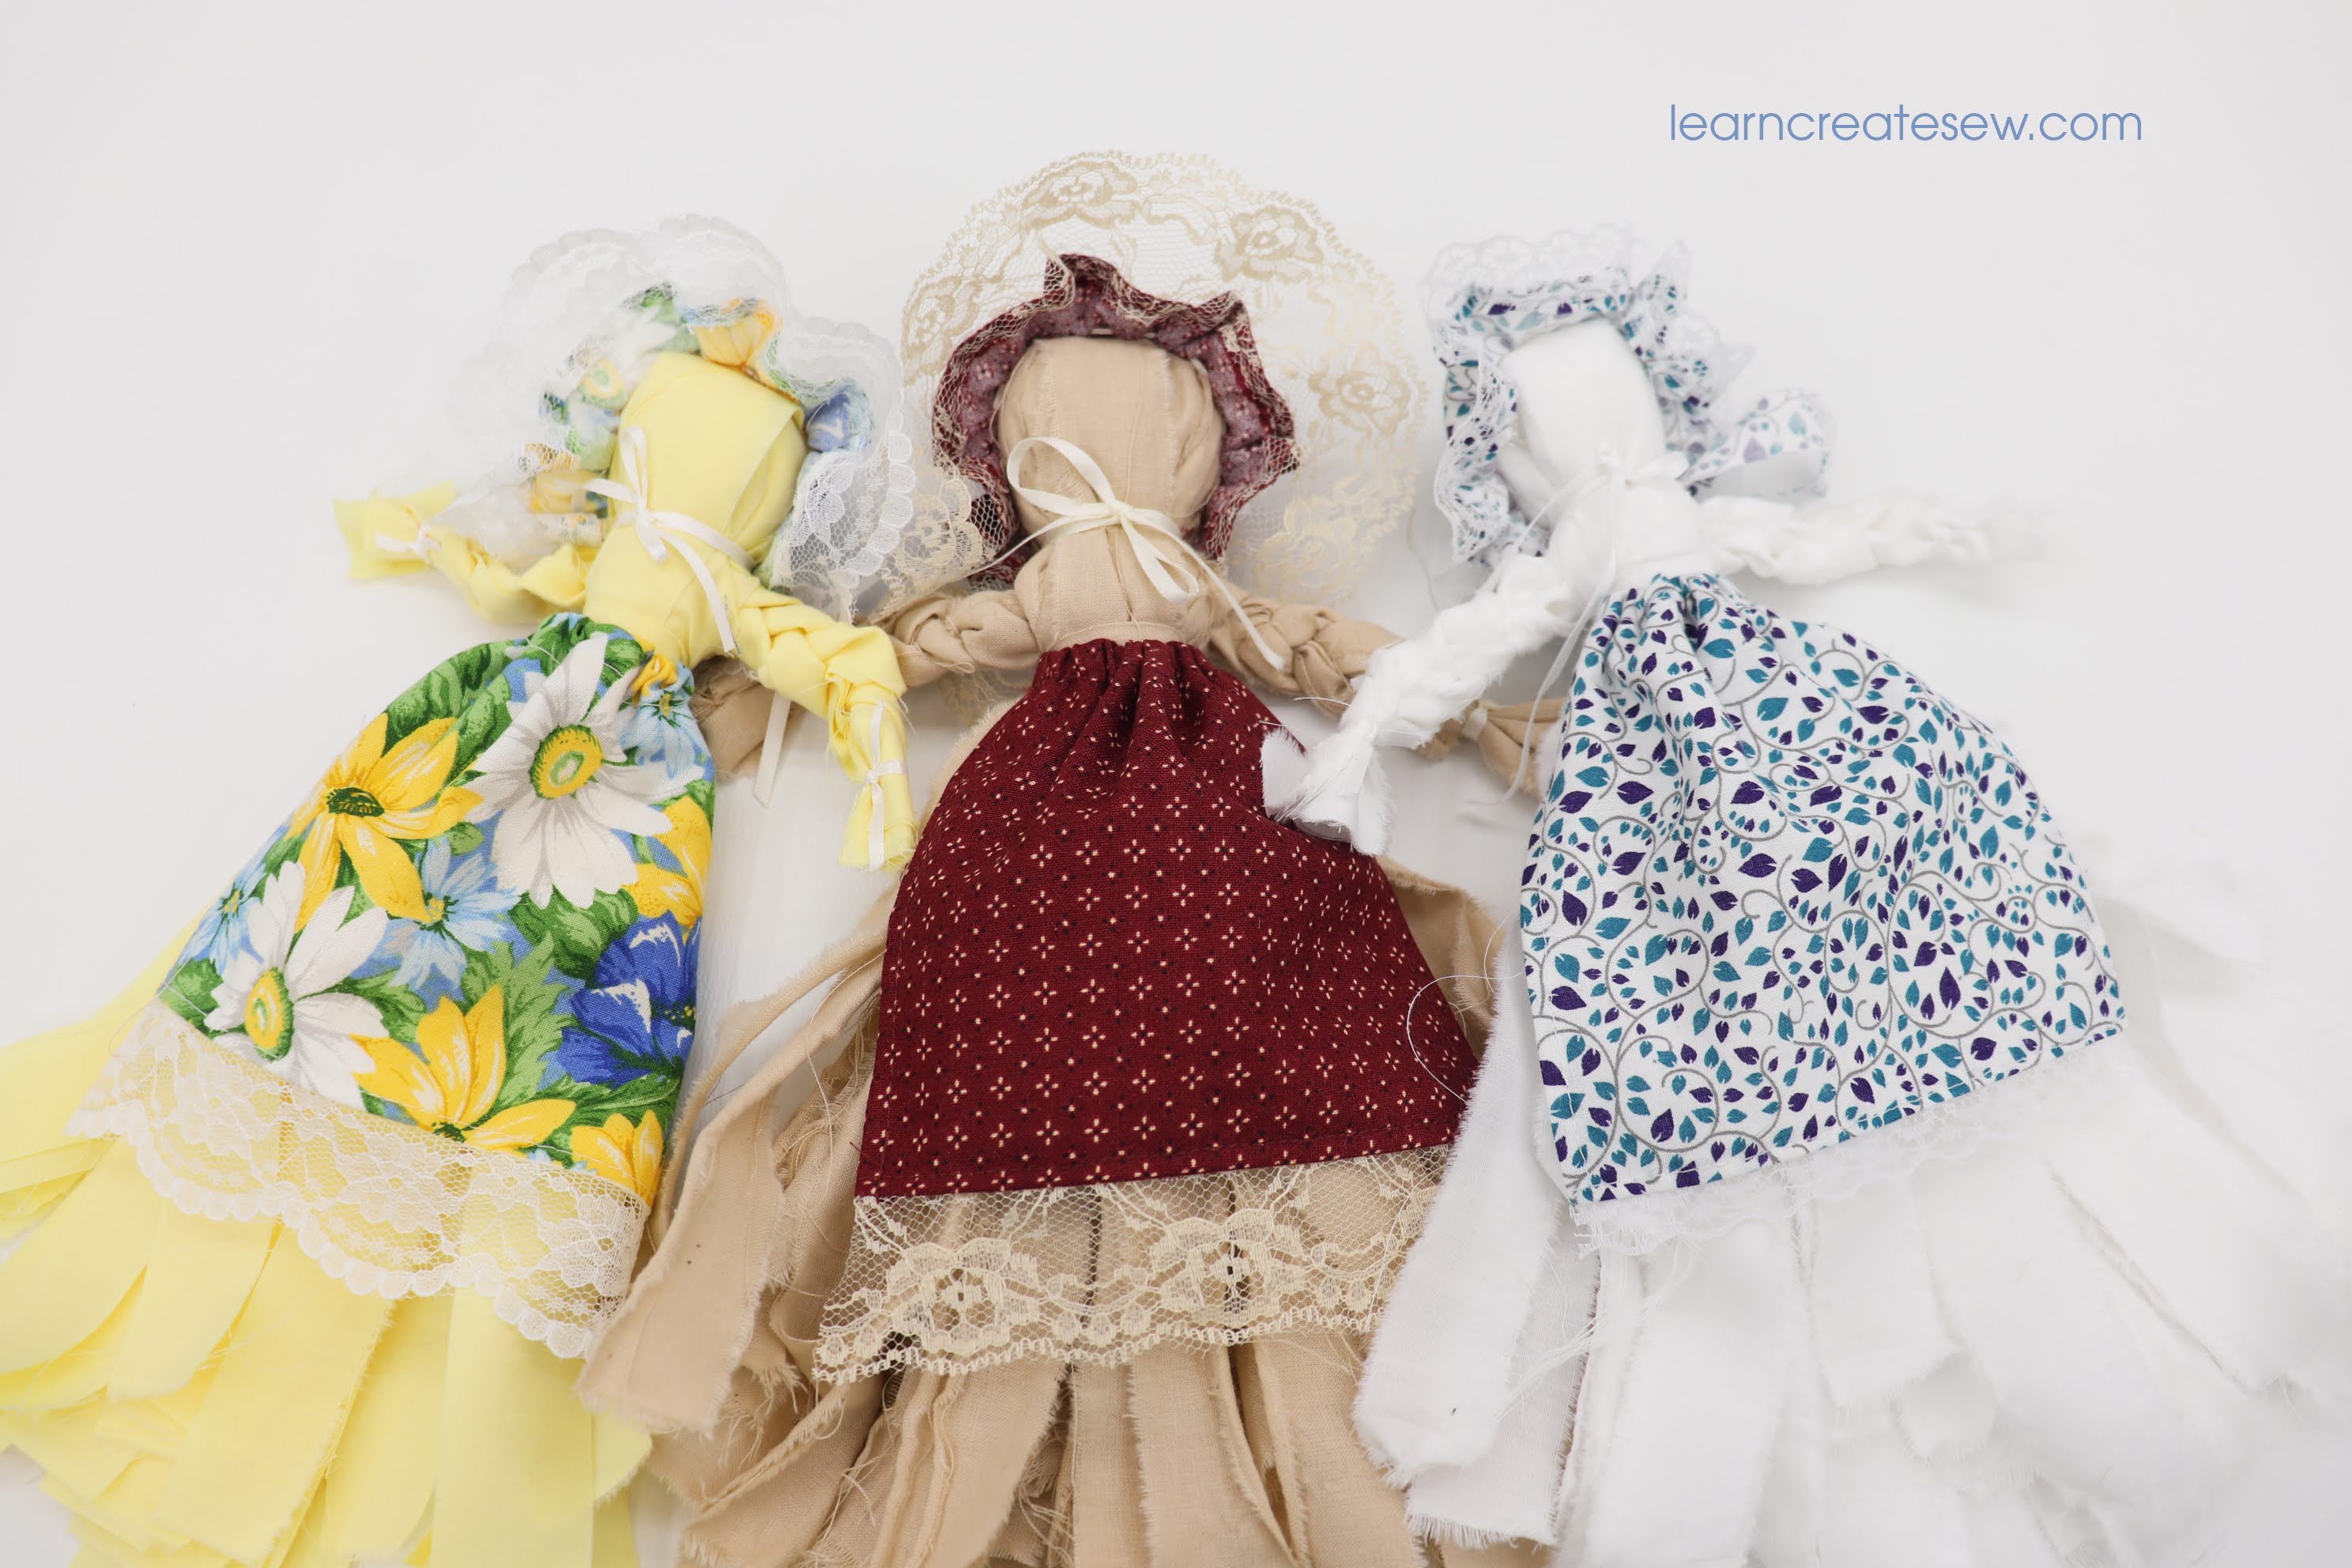
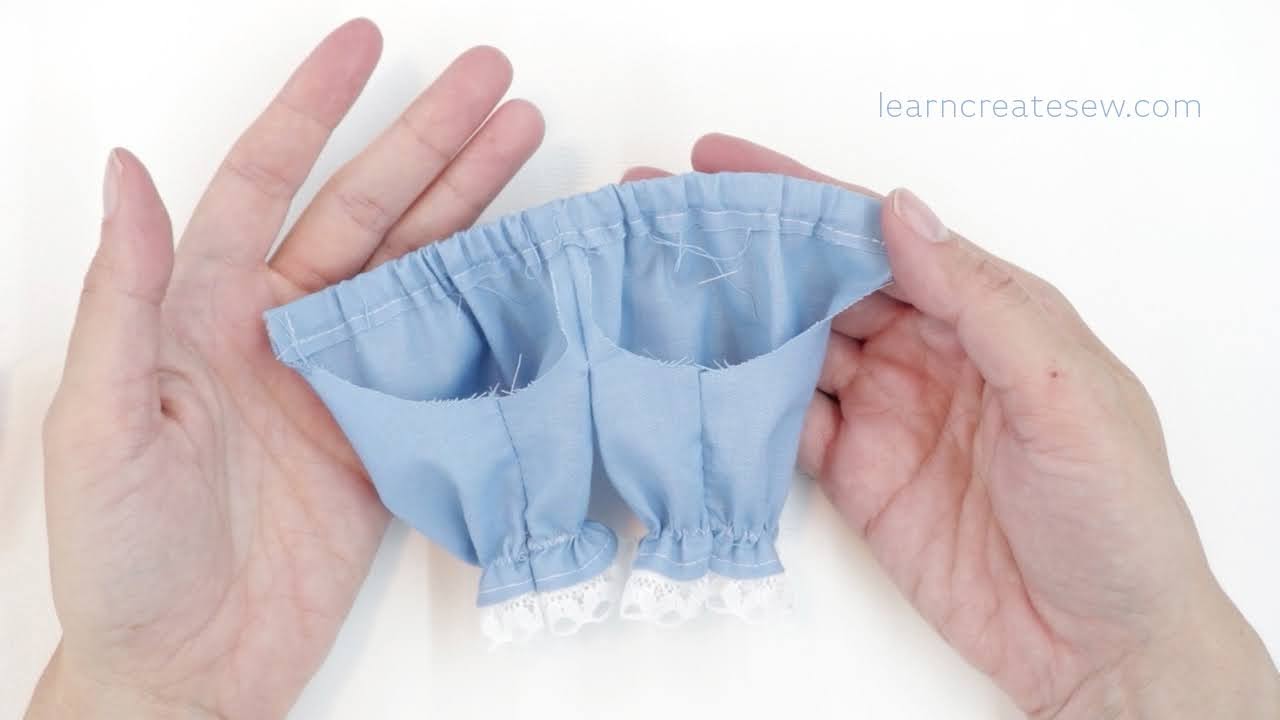
The bonnet and apron are stitched to add lace trim, finish the edges, create gathers, and make casings. I used flat lace trim, but you can use pre-gathered lace as well. The yellow and white dolls above were made using cotton/poly broadcloth and 3 cotton balls for the head. The doll below was made from dyed muslin and used 4 cotton balls to create the head. The muslin doll is a bit fuller and softer.

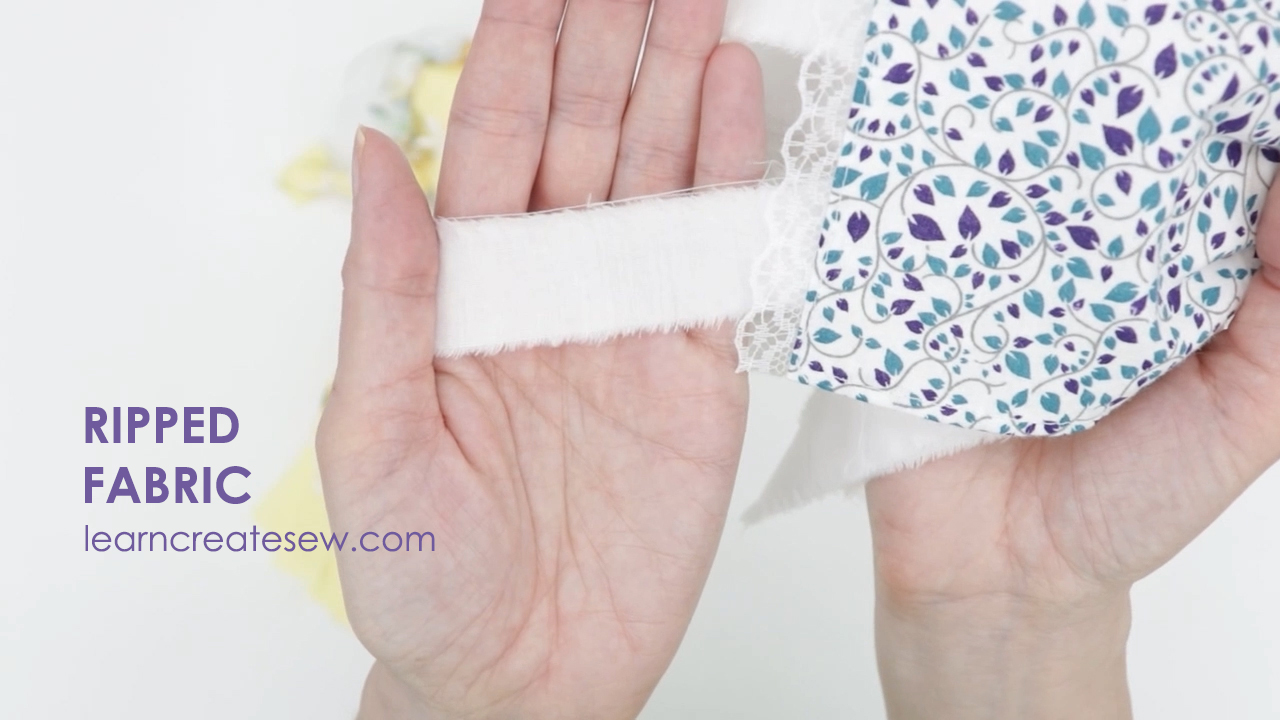
Each doll was made by ripping or cutting the fabric into strips arranged in a spiral, or wheel pattern, with the strips aligned at the center. Ties, either ribbon or fabric, are used to create the doll.

The doll will have a different texture depending on if you rip or cut the strips. The white and tan dolls were created with ripped strips, while with the yellow doll, the strips were cut using a ruler and a rotary color. The effect is a bit different. The ripped dolls are much softer and appear more rustic. They will all fray eventually since the fabric is not finished, but the ripped dolls have a lot more fraying to start.

Free Pattern:

Supplies:

  • 1/2 yard cotton fabric for body
  • 6 x 12 inches of fabric for the accessories
  • 2/3 yard of lace trim (optional)
  • 1 1/4 yard satin ribbon (1/8 inch wide)
  • Cotton Balls or poly-fil

The dolls do not stand on their own, so if you are interested, here are the doll stands that I used.

Detailed Instructions:

Quick Overview:

No- Sew Rag Doll

The No-Sew Rag Doll is a great option if you are making the project with small children or if you need a faster construction time.

The process is very similar, but the style is slightly different.

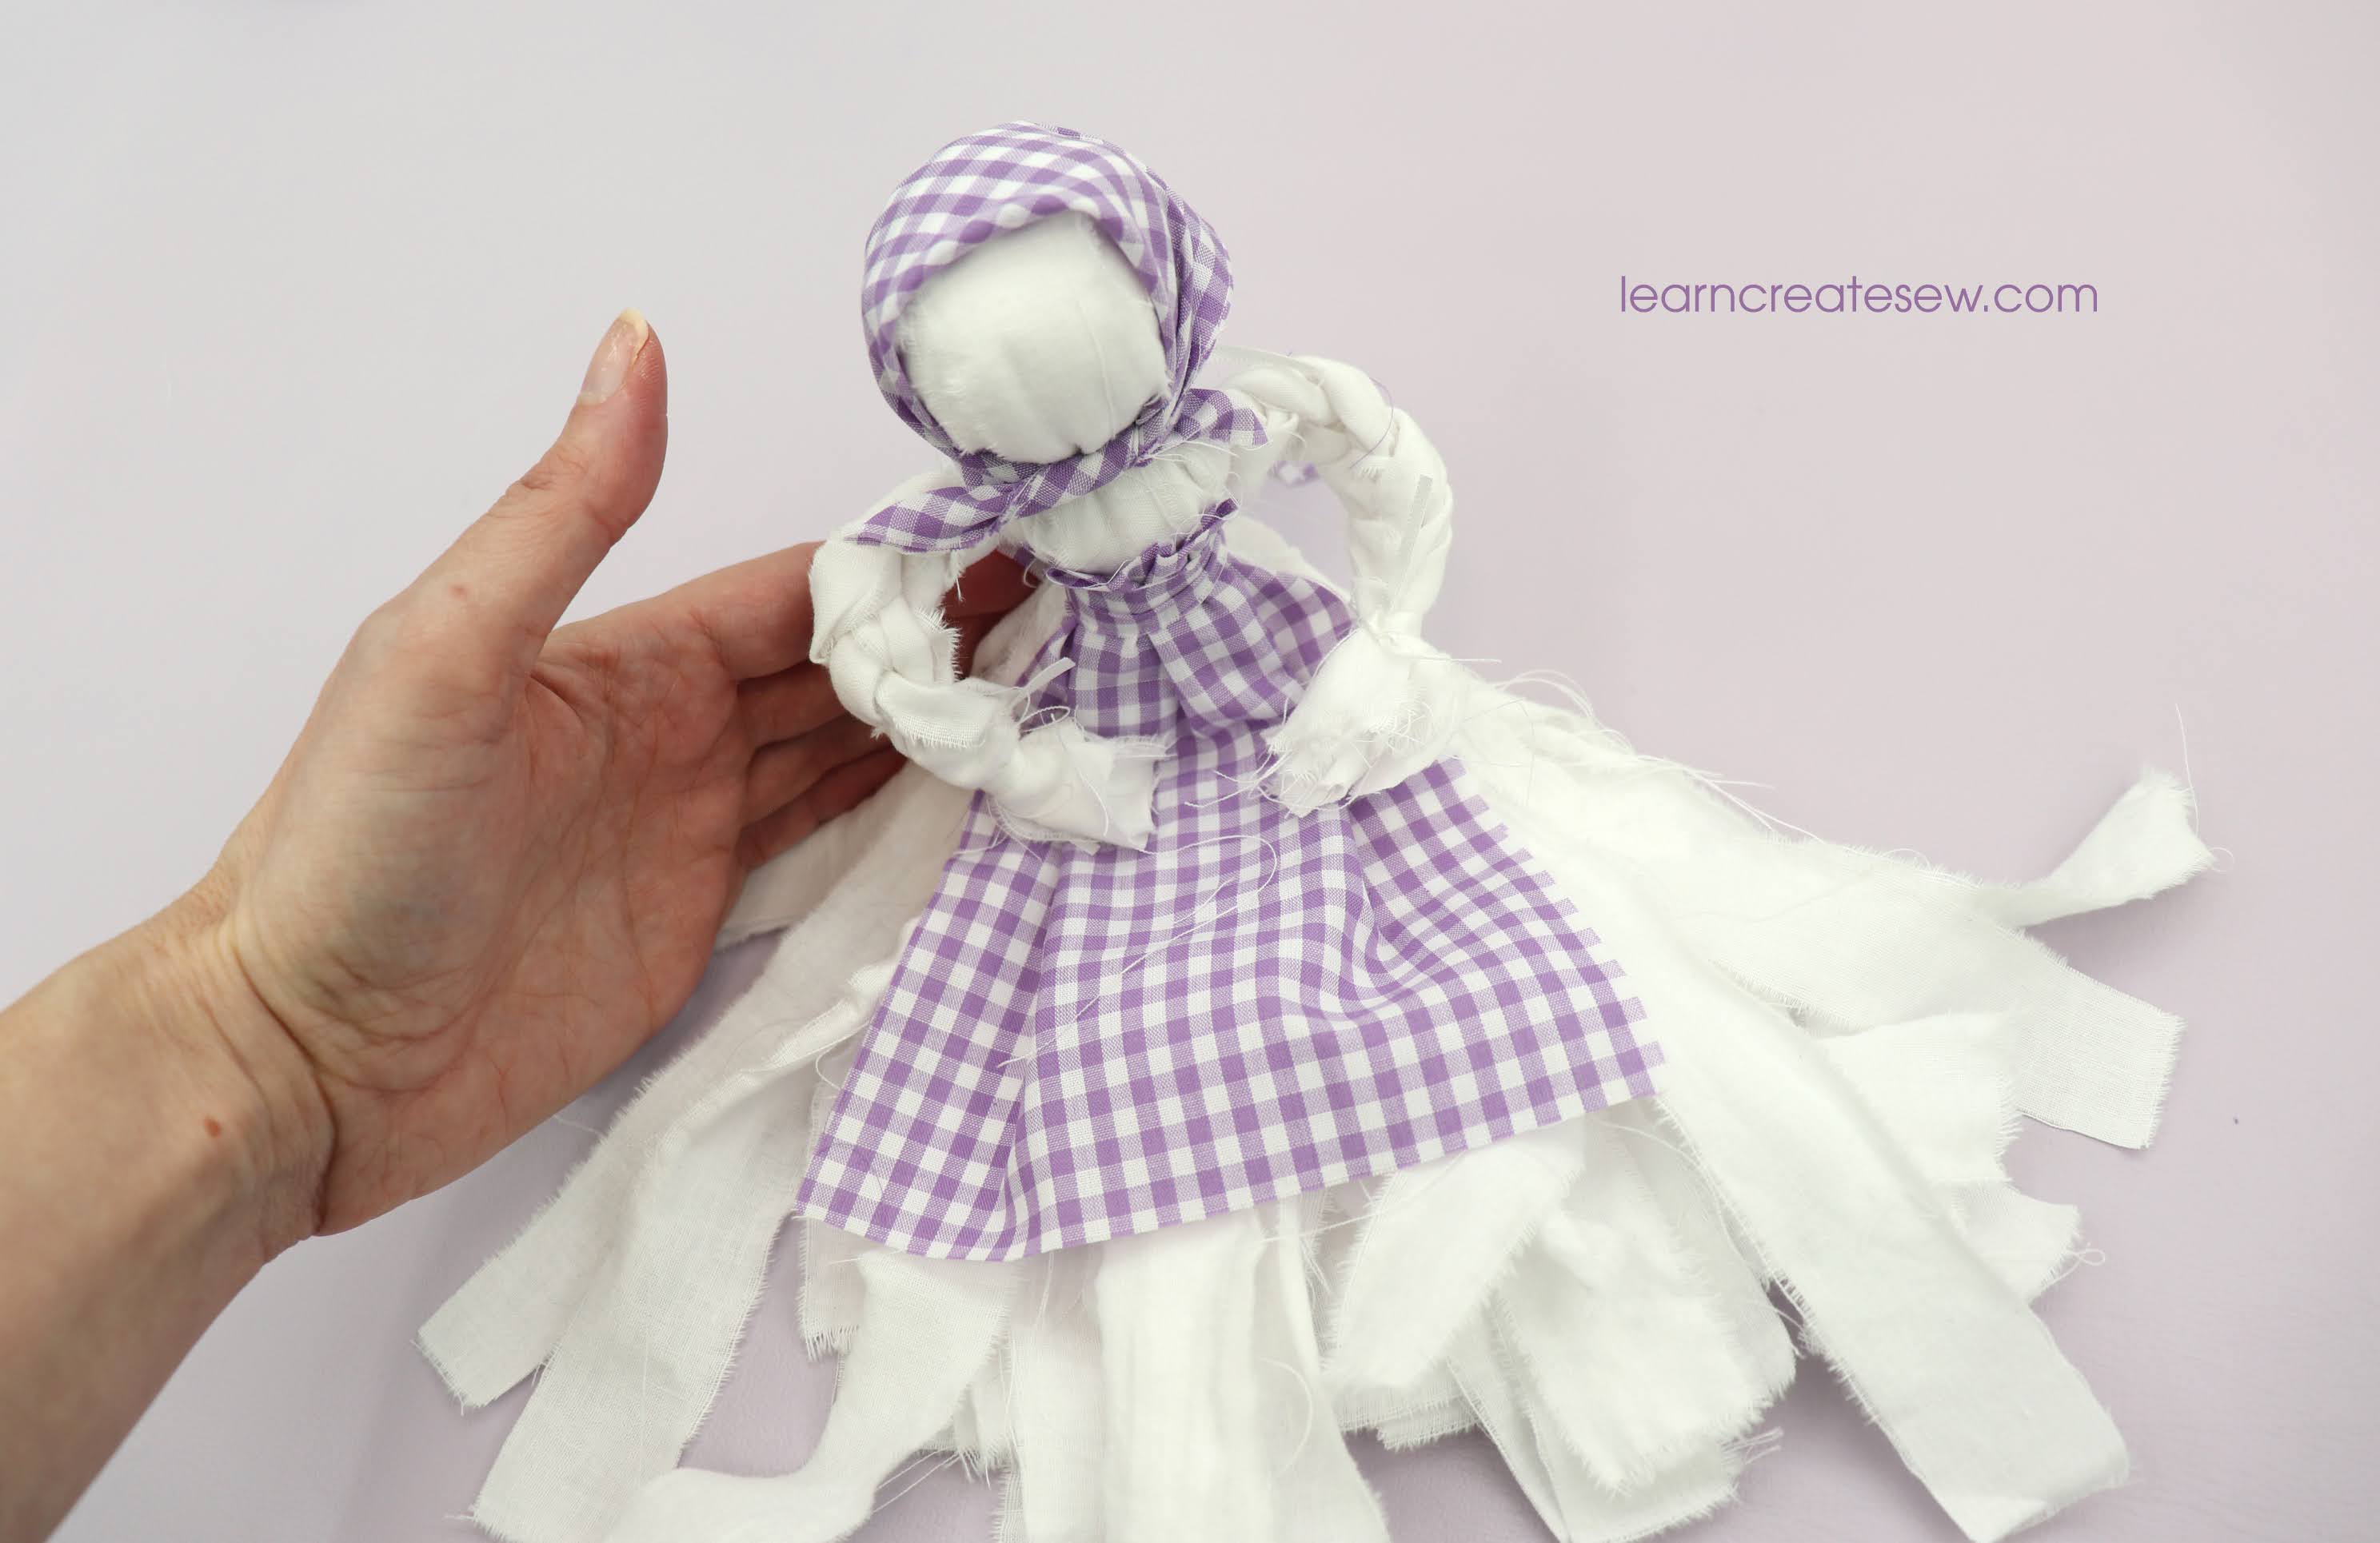
The No-Sew Rag Doll has a kerchief instead of a bonnet, and the apron is simply tied on.

Free Pattern:

Supplies:

  • 1/2 yard cotton fabric for body
  • 6 x 12 inches of fabric for the accessories
  • 3/4 – 1 1/4 yard satin ribbon (1/8 inch wide)
  • Cotton Balls or poly-fil

The dolls do not stand on their own, so if you are interested, here are the doll stands that I used.

Detailed Instructions:

Quick Overview:

Happy Sewing…or No-Sewing 🙂

Quilted Cosmetic Bag

Finally! A new project! I have always loved the look of quilted bags and snatched up the chance to make this one. I used this pattern to make Christmas gifts and they were a big hit 🙂

I find this project matches well with my LIPGLOSS HOLDER, which works great as a zipper pull and looks super cute 🙂

Supplies

* You can use pre-quilted fabric for this project if you prefer. You will need an 18 x 18-inch square as well as additional coordinating single-layer fabrics for the handle and tab.

Tools

  • Basic sewing tools and sewing machine
  • A fabric marking tool that vanishes or washes away ( I used Air Erase Markers)
  • Multiple bobbins, one for each coordinating thread color
  • Ruler
  • Walking Foot (recommended) and walking foot guide (optional)
  • Fabric Clips (recommended)
  • Tailor’s Clapper (optional)
  • Sewing stiletto (recommended – I used a Purple Thang, you can also use the back edge of your seam ripper)
  • Safety goggles or safety eyewear (recommended if using short or metal zippers)

Pattern:

The cosmetic bag measures approximately 7.25 x 5 x 2.5 inches.

Detailed Instructions:

Quick Overview:

This bag is made with foam interfacing, quilted between two layers of cotton. It gives the bag a nice soft appearance.

The bag has a large storage compartment, one front pocket, one handle, and one tab for opening and closing.

The bag is also completely finished, hiding all raw edges.

Even the interior pocket seams are hidden in this project!

To hide the seams I used single-fold bias tape, which lays flat over the seam allowance. As a result, you do see the stitches on the outside of the project, but they blend in nicely with the quilting stitches.

I find it easier to attach the binding prior to sewing the side gusset in place.

The zipper tape itself is used to hide the seam allowances along the edge of the zipper.

Topstitching helps the zipper to lay flat and encases the raw edges under the zipper tape.

I hope you enjoy making this yourself! Happy Sewing 🙂

Centered Zippers & the Sewing Sample Dictionary!

I recently took a college sewing class and absolutely loved the way the instructor taught the course. We kept all of our practice samples neatly organized in a binder so we could refer to them in the future! It was so helpful!

As a result, I decided to create my own Sewing Sample Dictionary. A reference book to help me organize my sewing samples.

To make your own Sewing Sample Dictionary, print out the templates and instructions for each sample.

Follow along on with the instructional video to create your sample. Then, use sheet protectors and a 3-ring binder to store your samples.

COVER:

The Centered Zipper Sample is my first addition to the Dictionary!

Tools:

  • Sewing Machine
  • Zipper Foot
  • Basic Sewing Supplies
  • Hand Needle and Thread
  • Fabric Marking Tool (I use air erase markers)
  • Grid Ruler
  • Seam Ripper
  • Iron
  • Sewing Stiletto or Purple Thang (The wrong edge of your seam ripper will also work)
  • Serger (Optional)
  • 3-Ring Binder (For Sewing Sample Dictionary – Optional)
  • Sheet Protectors (For – Sewing Sample Dictionary – Optional)

Centered zippers are one of the most common zipper applications. They are quick and simple after a bit of practice. There are a lot of different techniques out there, but this is my favorite!

Do you always end up with wobbly stitches or horrible backstitching around the zipper pull? Have to redo your zipper over and over before it actually looks nice? Never again! With a few simple techniques, your zipper can look great the first time!

To make this sample I used two rectangles of fabric. Each measured 4.25 x 7.5 inches. I also used a 5-inch nylon coil zipper. (NOTE: If you don’t use a nylon coil zipper you cannot sew over the teeth as shown in the video.)

Place the fabric right sides together and sew a 5/8 inch seam allowance using two different stitch lengths. The upper stitch length will be 5.0 (basting stitches) so they can be removed later. The bottom section will be stitch length 2.5 as they will remain. The transition point is where the zipper’s opening will stop and the seam will begin.

Press the seam flat to set the stitches. Then, press the seam open. Serge the edges to finish. Serging is optional but very much recommended if the zipper will be in an unlined garment.

Turn the fabric right side up, and draw your stitch line. This will be three sides of a rectangle. Draw a line 1/4 inch to the left and right of your seam. Start at the top edge and stop where your stitches change length. Connect the two at the bottom.

Now, we will attach the zipper.

Turn the fabric right side down and place the zipper right side down on top of it. Make sure to leave enough room at the top for seam allowance. I usually place my zipper so the top stops are 7/8 of an inch from the top edge.

Hand-baste the zipper in place along the edges. The basting stitch should not be on your drawn line as it will make them difficult to remove later. It is tempting to skip this step, but I highly recommend that you don’t. It only takes a minute and it really improves the quality of your zipper application. It also provides a greater chance of success the first time!

From the right side, sew the zipper in place by stitching exactly on your draw line. Make sure your zipper foot is on your machine. Use stitch length 2.5 or whatever is appropriate for your fabric. Be sure to use a sewing stiletto or purple thang to move the zipper pull out of the path of the stitch line when you sew. You do not what to hit it! If you don’t have a sewing stiletto the back edge of your seam ripper works great as well, just take care not to accidentally cut your fabric.

Remove the hand basting stitches as well as the machine basting stitches (length 5.0).

And you are finished!

Now all you have to do is add the zipper to your Sewing Sample Dictionary!

Centered Zipper Sewing Sample Dictionary Template:

Centered Zipper Sample Pattern:

Quick Overview:

Detailed Instructions:

What to add more to your Sewing Sample Dictionary? Here is some more information on zippers!

Zippers are used absolutely everywhere! Once you start sewing with zippers, it is important to know what all of the bits and pieces are called. Zippers can be intimidating to the new sewer. Being familiar with the components and terminology will help clarify sewing instructions and patterns and make them easier to use.

Sewing Sample Dictionary Template:

Printable Diagrams:

Instructional Video:

Happy Sewing!

Underbust Corset

I absolutely love corset making! I have made several over the years, and while they can be a challenge I always consider them a fun endeavor and a great addition to many costumes.

I recently picked up the book Corset Making by Julie Collins Brealey, and I really enjoyed it. I used the techniques described in her book to draft my own underbust corset pattern. It turned out great! I highly recommend her book if you would like to draft a corset pattern specific to your body measurements.

After completing my corset several of my students expressed interest in making a corset of their own. So, I decided it would be fun to share the techniques I used with everyone! This is just a simple costume corset and is not intended for tight lacing. I also used budget-friendly easy-to-find materials. For beginners, I think it is important to see if you enjoy the process of corset-making before investing in some of the more expensive materials and tools. I find corset making very rewarding, but many find the process frustrating and would prefer to purchase a ready-made corset instead.

But for those willing to face the challenge, who love corsets as much as I do, this tutorial is for you!

What are the most important skills in corset making, you ask? Organization and precision!

Unfortunately, in corsets, errors are often amplified. There are SO many seams, that a small discrepancy in cutting or sewing can leave the size of your corset off by an inch or two. As a result, I make precision a priority and cut the pieces out in a single layer. Corsets have tons of pieces. Those pieces often look very similar. It is super easy to get them mixed up. As a result, I like to label all of my pieces with significant markings, piece names, and top edges. This helps me ensure that I don’t get pieces mixed up while I am sewing.

For similar reasons, I like to lay out my pieces in the correct order prior to sewing so they stay in the proper position as I put them together.

This corset is constructed by assembling a fashion layer and a structure layer and sandwiching them together. Boning casings are made by sewing the two together. No separate casings are needed!

The trick is to ensure that those two layers are the same size so the seams align!

I tried two different pressing methods for my corset. Pressing the seams open and pressing to the side. Watch the detailed instructional video to see what I liked best!

I used zip ties for the bones in my corset! I have always wanted to try them out, and while I found that a lot of them weren’t perfectly straight, they worked great! It was simple to grab a package of zip ties and some pet nail trimmers at Walmart. No waiting for shipping or delays. While they may not be the best option, they worked surprisingly well, and I wouldn’t hesitate to use them again for simple costume corsets.

Rather than eyelets, I used grommets with washers in my corset. These are a bit stronger and last longer. I used a grommet press, but grommet setters that use a hammer are also available.

To finish off the corset I made coordinating bias binding. You can see my skill-building tutorial for how to make your own! I just love it when the binding actually matches your project!

I like to finish the binding by hand to give it a nice finish.

Supplies: (Actual quantities may vary depending on size and style)

Tools:

  • Basic Sewing Supplies
  • Sewing Machine
  • Grommet Setter (and hammer) or Press
  • Awl or Grommet hole punch (I use a small sharp awl and a tapered awl)
  • Rulers
  • fabric marking tools
  • Plastic boning trimmers (I used pet nail trimmers. Sturdy scissors often work for thin plastic boning.)
  • Protective Eyewear
  • Sandpaper (optional)
  • Sewing Clips (optional)

Patterns: PATTERNS INCLUDE NEGATIVE EASE! There is an intentional 2-inch gap in the back. Corset will be smaller than the measurements given. (Measurements indicated are the body measurements, not corset measurements, with the exception of height.)

Measurements are in INCHES

SizeUnderbustWaistHigh HipWaist to HHHeight at Center Front
Original302934.53.59.5
C26.423.929.749
D2825.531.349
MORE SIZES COMING SOON!

Size Original: (UB 30, W29, HH 34.5, W to HH 3.5, CF Height 9.5)

Size C: (UB 26.4, W 23.9, HH 29.7, W to HH 4, CF Height 9)

Size D: (UB 28, W 25.5, HH 31.3, W to HH 4, CF Height 9)

More sizes coming soon!

Quick Overview:

Detailed Instructions:

Happy Sewing!

Bias, Continuous Bias Binding, and Grainlines

For many projects, a bit of coordinating bias binding can make a huge difference in overall quality and appearance. It can be tempting to just grab a package of premade binding from the store, but it is SO nice when it actually matches your project! The process of making your own can seem a bit strange at first, but once you get the hang of it can go pretty quickly.

Bias binding needs to stretch to mold around curves and edges. As a result, the binding has to be cut in the correct direction. Being familiar with the different grainlines of a woven fabric is very helpful. (See the video below for more information on fabric grainlines.)

Cut a square or rectangle of fabric. You then want to identify these grainlines on your fabric. I often use scrap fabric to make bias binding. (See the video below for how to identify the grainlines on your scrap fabric.) Most commonly, I use a fat quarter, but if I only need a little I have used squares as small as 10 x 10 inches.

Mark the bias line and cut along the line.

With the right sides together, sew the two pieces together along the lengthwise grainline.

Press the seam flat and then open. The seam is going in the same direction as the lengthwise grain. This means that the bias is at a 45-degree angle to the seam.

Turn the fabric so the bias edge is now on the bottom.

Draw lines parallel to the bias edge. The lines shown below were drawn 1 inch apart. This separating distance will be the width of your bias strips. You can make them wider, or more narrow depending on what you need for your fabric. A narrower strip will yield more yardage than a wide one. The rectangle below, which was 10 x 14 inches, provided about 3 yards of 1-inch wide bias strips.

Mark a 1/4 inch seam allowance on each side (following the cross-grain edges). Fold the fabric so it is right sides together. Offsetting the fabric by one strip, align the intersection points. See the instructional videos below for more details.

Stitch along the 1/4 inch drawn seam line (cross-grain) and press the seam open.

Cut along the lines to create a long continuous bias strip.

If needed, you can then fold the two raw edges to the center and press. This step is easier if you use a bias tape maker to help you. I am using a 12mm bias tape maker for my 1-inch strip.

Tools/Supplies:

  • Woven Fabric – Fat Quarter or Scrap fabric (recommend no smaller than 10 x 10)
  • Coordinating thread
  • Iron
  • Grid ruler
  • Precise fabric marking tool or sharp pencil
  • Scissors
  • Pins
  • Sewing Machine
  • Bias Tape Maker – half the width of your strip (optional)

The Grainlines of Woven Fabric: Lengthwise Grain, Cross Grain, and Bias

Identifying Grainlines on Scrap Fabric – (This clip is Included in the detailed instructions for bias binding video.)

Making Continuous Bias Binding Quick Overview:

Continuous Bias Binding from Scrap Fabric Detailed Instructions:

Happy Sewing!

Classroom Window Curtain

I was recently asked to help with a service project at our school. Parent volunteers are making curtains for all the classroom windows! They are going to be so nice!

Our school will be attaching the curtains to the door using velcro. If your school isn’t doing that you can use magnets, or ribbon loops with 3M hooks instead.

There are two magnets at the base of the curtain which will help it stay in place when in use. If you don’t want the magnets to be visible on the outside of the curtain, select a darker fabric print.

A ribbon and button will hold up the curtain when it is not being used.

This is a quick and easy project and can usually be completed in 15 – 30 minutes.

Supplies:

  • 3/4 yard of cotton fabric (this is enough fabric for two curtains)
  • 1/2 yard ribbon (1/4 inch wide) – (You will need more if you plan to attach the curtain using loops)
  • One Button (3/4 – 1 inch wide)
  • Sew-on Velcro (Loop side only – Approximately 1/4 yard)
  • Two Magnets (18mm) – (I needed 6 magnets to attach the curtain to the frame without the velcro)
  • Coordinating thread

Tools

  • Sewing Machine
  • Ruler
  • Fabric Marking Tool
  • Zipper foot (optional, but may be necessary on some machines)
  • Basic Sewing supplies (pins, scissors, etc.)

Quick Overview:

Detailed Instructions:

Happy Sewing!

Sloth Plush Dress

I have long been meaning to post a tutorial on how to make a dress for the Sloth plush, but it always seemed to slip my mind. A special thanks to Carol for reminding me about it! The dress is a cute little addition to the sloth plush and a lot of fun to make.

I don’t have a video for this one, but I do have several photos. I hope you find them helpful.

That said, let’s get down to business!

Here are some quick instructions on how to make the dress.

First, cut out the pieces. The skirt rectangle is approximately 3 x 18 inches, but you can adjust that as desired.

Hem the bottom and two sides of the skirt with a double-fold narrow hem. Approximately, 1/4 inch wide.

Gather the top edge.

Pin two of the bodice front pieces to a bodice back piece, right sides together. Align the dashes marked on the pattern.

Stitch the side seams with a 1/4 inch seam allowance. Only sew above and below the dashes, leaving a gap in the middle. This is for the sloth’s arms to pass through.

Repeat this process again for the other front and back pieces. You should end up with two identical dress bodices. Press the side seams open on both bodices.

Fold up the bottom edge of one of the bodices 3/8 inch. Press. Keep the bottom edge of the other flat.

Lay the bodice with the bottom edge flat (the one you did not press) right side up. Place the skirt right side down on top of it. Align the gathered edge of the skirt with the raw edge of the bodice. Let the bodice extend an extra 1/4 inch on each side beyond the skirt. Stitch the skirt in place along the gathered edge with a 1/2 inch seam allowance.

Flip the skirt down and press the seam allowance toward the bodice.

Place the dress right side up. (You can disregard the topstitching shown on the bodice in the photo. It’s not necessary in this step. We will get to that later.)

Lay the other bodice, the one with the folded bottom edge, right side down on top of the dress. Align seams and edges of the bodice pieces. Make sure the seams are open and flat. Sew all of the way around the edge of the bodice with a 1/4 inch seam allowance, everywhere except the bottom edge where the skirt is attached, that will stay open. (None of your stitches should be on the skirt section. Only the bodice fabric is being stitched.)

Clip the curves and corners.

Flip the bodice right side out and press. Carefully align the bottom edge of the folded bodice so it covers the gathers and hides the seam allowance on the inside. The folded bodice edge should extend about 1/8 inch below the stitch line of the skirt. Flip it over. Pin in place as needed. From the front side, topstitch along the bottom of the bodice edge (more detailed photos below) and then press again. The skirt will now be sandwiched between the two bodice layers.

I usually topstitch with a 1/8 inch seam allowance.

Notice there is an opening for the arm hole.

Topstitch around the slit with a 1/8 inch seam allowance.

Add decorative ribbon, buttons, or trim if you like.

Try the dress on your sloth and then attach a closure. Velcro, buttons, and snaps all work great.

And your dress is done!

Happy Sewing!

(FYI, the shoulder seams were done differently in this picture. I still love the dress but prefer the technique described above.)

Sew Easy Gift Bags

I am happy to share my latest project with you today! These are quick and easy drawstring gift bags.

I made mine quite small, but you can easily adjust the size. These are great for scrap fabric projects and are perfect for the holidays! They are also fun for beginning sewers.

There are two style options available, flat or standing. The standing bag has boxed corners.

Supplies:

  • 1/3 yard (or more) fabric or scrap fabric – (The process is easier if you select a fabric that can be ironed)
  • 1 1/2 yards (or more) of 1/4 inch wide ribbon
  • Coordinating Thread
  • Fray Check (Optional)

Tools:

  • Sewing Machine
  • Iron
  • Fabric Marking Tool (a pencil often works)
  • Ruler
  • Safety pin
  • Fabric Scissors
  • Seam Roll (Optional)

Free Pattern & Custom Sizing Information:

Quick Overview:

Detailed Instructions:

Happy Sewing!

Rag Doll Bloomers

It is so nice to have the time to post projects once again! This project is here for you today thanks to a viewer request. Thanks Joanne for your idea!

This is a quick little project that is a great addition to your rag doll.

These beauties are available in 3 lengths, Short – Undies (Above) , Medium – Bloomers (Below), and Long – Extra Long Bloomers (Not Pictured).

This project is pretty quick, but their tiny size does make them a challenge. As a result, I tried to make as many of the steps as possible flat.

The hems in this project are finished with a single fold. If you want to avoid fraying, you can finish the top and bottom edges with a serger. You could also use double fold hems by add 1/4 inch to the top and bottom edge of the pattern and folding over 1/4 inch before following the other directions shown in the video. This may be recommended if you plan to remove the bloomers from the doll frequently.

There are two waistband styles demonstrated in the video. One is constructed flat and the ends of the elastic are visible in the seam allowance. The other is constructed in the round and the elastic is completely hidden.

You can also add lace to the bottom edge to add a bit of extra cuteness 🙂

To help reduce bulk, instead of adding an elastic casing using fabric or binding, I used a zig zag stitch over narrow elastic cord. This worked very well around the teeny tiny legs of the rag doll.

Free Pattern:

Supplies:

  • Scrap Cotton Fabric ( or 6 x 16 inches)
  • 1/2 yard Narrow Cord Elastic (1.5mm) (I used beading cord elastic)
  • 6 inches of 1/4 inch wide elastic
  • 1/2 yard Narrow lightweight lace (optional)
  • Coordinating Thread

Tools:

Detailed Instructions Video:

Quick Overview:

Zipper Pocket

I have been making a lot of bags lately and one feature that I use almost all of the time is a zippered pocket.

These are super cute and convenient on both the inside and outside of the bag!

To create a zipper pocket you need one zipper, fabric for the pocket, and the fabric panel (either lining or exterior fabric) where you want the zipper to be placed. You begin by placing them fabric pieces right sides together. You then sketch a rectangle for the zipper window on the wrong side of the pocket fabric. I like to make the zipper window at least 1 inch below the top edge of the pocket fabric and at least 1 inch from each side. I also like to make the window 3/8 inch tall. (You may need a taller rectangle if you are using a zipper with larger zipper teeth.

You then stitch EXACTLY on the rectangle. This is super important! For years when I tried making a zipper pocket it always looked sloppy because I wasn’t careful about stitching the rectangle. To help myself be more precise I now use stitch length 2.0. I also slow down as I approach the corners and make sure I pivot with a 90 degree angle. Another trick that helps is to count the number of stitches you use to show the first short side and use the same number of stitches on the other short side. This will help make a nice even rectangle.

TIP: If you accidentally stitch too far, or mess up, I recommend taking the time to go back and fix it. It makes a big difference. Avoid simply backstitching to correct the error if you go too far. This actually makes the pocket harder to turn and it won’t lie flat in the end.

Next, you will clip the center of the window. Cut a line horizontally down the center of the box. About 1 cm from each end angle off to the corners. Clip very close to the stitches but be sure not to actually cut the thread!

Before I turn my fabric I really like to press. I find this helps the fabric to lay flatter and creates a better rectangle.

I fold the pocket fabric down along the top of the row of stitches of the rectangle and press. Then I do the same, lifting the pocket fabric up and pressing on along the bottom edge of the rectangle. And repeat for the left and right. It helps SO much!!!!

Then after pressing, I turn the pocket fabric through the opening, shaping the rectangle and press. I like to press from both the pocket side and the main fabric side.

TIP: Using a tailors clapper to help press is also really nice! It helps trap in the heat and set the folds.

Finally, you are ready to add the zipper! Simply lay the zipper right side up and place the window you created right side up on top of it. You can use pins, fabric glue, or double sided wash away tape to hold the zipper in place. Then stitch around the rectangle with a 1/16 – 1/8 inch seam allowance.

TIP: Before you start sewing make sure you know where the metal stoppers for your zipper are placed. You don’t want to accidentally stitch on one. It could cause damage to your tools and./or injury.

Once the zipper is attached it’s time to make the pocket! Simply fold the bottom of the pocket fabric up so that it touches the top of the pocket fabric, with right sides together. Pin around the edges (of just the pocket fabric) and sew with a 1/4 inch seam allowance. You will have to move the main fabric out of the way as you do this.

And the pocket is finished!

Below are video instructions for how to create the zipper pocket! There is both a Quick Overview and Detailed Instructions.

QUICK OVERVIEW:

DETAILED INSTRUCTIONS:

Happy Sewing!